Processing E-Orders (v2.8)
In some companies using inter-branch transfers / inter company trading (IBT/ICT), when purchase orders for stock are created in Micronet by the branches and then sent through to Head Office (FILE | SEND TO HEAD OFFICE), the orders are received in Head Office as e-orders.
In the past, Head Office staff would load each e-order in the Invoice Creation program and post it as paperless for picking and delivery to the branch.
In Micronet 2.8, Head Office users can view a list of all e-orders received and post multiple orders to the paperless queue at once using the Warehouse Scheduler or Wide Warehouse Scheduler. In addition, e-orders can be held in the Scheduler waiting to be checked and approved by an authorised user before being sent to the paperless queue for picking.
|
|

|
Reference
This process only works with the Amber model of IBT/ICT – seeo "Introduction to IBT / ICT".
To implement the approval process for e-orders, you first need to set the Approve E-Orders field on the IBT Configuration screen in your company settings to Yes – see "Setting up IBT / ICT".
|
To process and/or approve e-orders in the Warehouse Scheduler (or Wide Warehouse Scheduler):
- Open the Warehouse Scheduler.
Refer to "Displaying the Warehouse Scheduler".
Micronet displays the Warehouse Scheduler - Picking Slips tab.
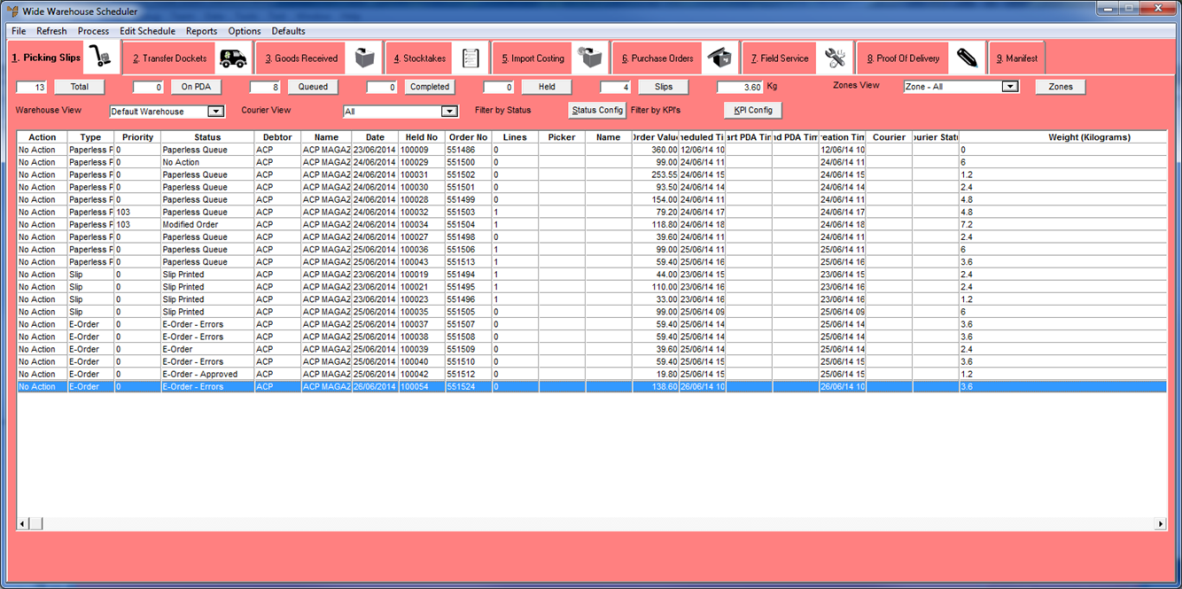
E-orders come into the Scheduler with a Type of E-Order. Existing e-orders which have been amended at the store and re-sent are shown with a Status of Modified Order and as Modified in the Modified column.
- If required, you can filter the picking slips displayed using the Warehouse View, Filter by Status and Filter by KPI's fields at the top of the screen.
Refer to "Selecting the Picking Slips to View (v2.8)".
- Select REFRESH or press F2 to display the selected picking slips.
For more information about the fields on this tab, refer to "Viewing or Changing the Status of a Picking Slip (v2.7)".
- To view or approve an e-order, double click on the order or select it and press Enter.
Micronet displays the Picking Slip Inquiry screen – see "Select Process Slips - Inquiry".
- Select Exit to clear the inquiry screen.
Micronet displays the Select Process Slips screen.
.png)
The fields and menu options on this screen are the same as for any other picking slip and you can perform all the same functions – see "Maintaining a Picking Slip (Priority, Picker, etc.) (v2.8)". The only differences are in the Type and Status fields:
|
|
Field
|
Value
|
|
|
Type
|
Micronet displays the picking slip type as E-Order.
Once the e-order has been approved, it changes automatically to Paperless Picking.
|
|
|
Status
|
Micronet displays the order status, which can be one of the following:
- E-Order – an e-order with no errors
- E-Order - Errors – an e-order where there is an error on an order line, the debtor is on hold or the credit limit has been exceeded
- Modified Order – an existing e-order (with a Status of Paperless Queue or Paperless Held) has been amended at the branch (e.g. quantity changed, item added, etc.)
- Paperless Queue – the e-order has been approved and any line errors have been fixed.
|
- To approve the e-order lines, select APPROVE.
Micronet displays the Approval - E Order screen.
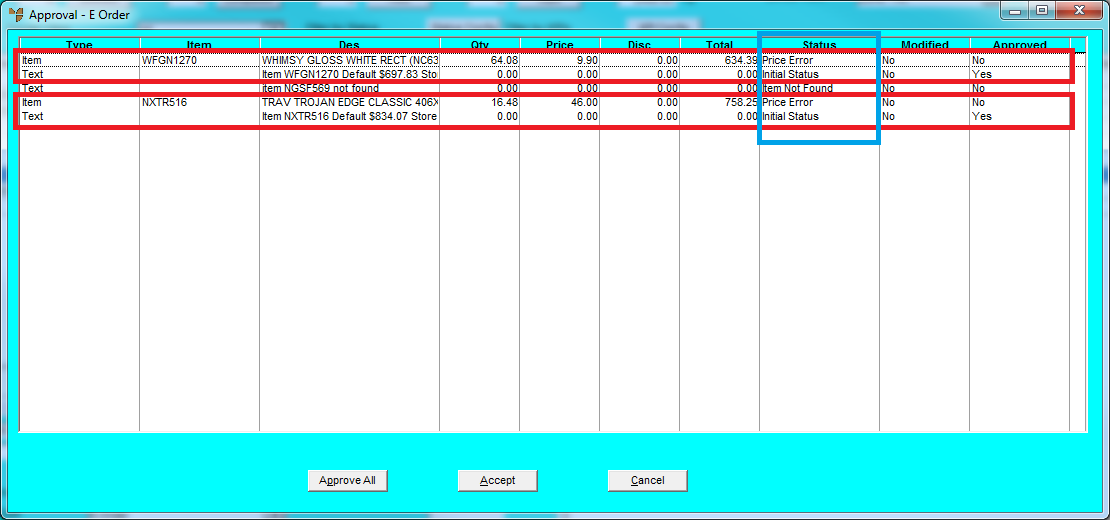
This screen shows each item line on the e-order (highlighted in red above). If there is a problem with an item line, Micronet displays a text line immediately below it outlining the details.
|
|
Field
|
Value
|
|
|
Status
|
This is the status of the item or text line (highlighted in blue above):
- Initial Status – no errors
- Price Error – the branch price and the default Head Office price are not equal
- Item Not Found – the item does not exist at Head Office.
|
|
|
Modified
|
When an existing order has been amended at the store, Micronet shows that it has been Modified. This means that either the quantity or the Consolidate flag for the line has been changed, and the line needs to be checked and approved.
|
- If every line is in Initial Status and has not been modified at the store, you can approve the entire order by simply selecting the Approve All button.
- For order lines in any status other than Initial Status, or where a line has been modified at the store, double click on the item line to be approved and then follow the appropriate procedure:
|
|

|
Technical Tip
All errors must be rejected, or corrected and approved, before you can continue.
|
- When all lines have been checked and approved/rejected, select the Accept button on the Approval - E Order screen.
Micronet checks whether the debtor is on hold and whether the order exceeds credit limits. It also checks the appropriate user security options. If authorisation is required, a screen is displayed where an authorised user can enter their userID and password.
- If the debtor is on hold or the order exceeds credit limits, complete the appropriate procedure:
If the purchase order is not approved, the order Status is set to E-Order - Errors on the Select Process Slips screen.
If the order passes all checks, the order is approved and the order Status is set to Paperless Queue on the Select Process Slips screen. At this stage, stock is allocated and the store is limited as to what changes it can make to the order.
- Select the Accept button on the Select Process Slips screen.
Micronet redisplays the Warehouse Scheduler - Picking Slips tab with the updated e-order(s) waiting in the Paperless Queue. The orders will not be downloaded to PDAs for picking until they are released.
|
|
|
Technical Tip
When an e-order is posted to the paperless queue, Micronet checks each line on the order and sets the appropriate procurement option according to your supply chain configuration – see "Edit - Program - Supply Chain Config (v2.8)" and "Setting up a Supply Chain (v2.8)". The status is also determined by the procurement option, e.g. if there is insufficient stock the status changes to Paperless Held - Insufficient Stock.
|
You can now create purchase orders for the store orders, and you can allocate stock from the purchase orders to the store orders.